
If I get a nibble of a particularly buttery crust, I consider it a pretty damn good day.
It’s impossible for a day NOT to be improved by crust (albeit in moderation).
Do you want to make a delicious, homemade vegan pie crust but also want it easy to learn and replicate?
Here’s the thing, crust is one of those rare birds that you WANT not to worry about making because it turns out it’s best when you put zero thought into it.
Sounds weird, I know.
Ever heard the phrase “The dough senses fear”? I’ve only ever known this to be true. Fear turns to hesitation in the hands, and reluctance in the hands leads to non-confidence in your actions and intentions, leading to poor quality results.
Ergo, the less worry you put into something, the better it turns out; the more heart goes in, the more delicious it is.
So, this is meant to be minimal thought and effort.
Something quite philosophical in that. Chill vibes = good food.
Hell yeah.
Cube butter into medium-size cubes and freeze solid.
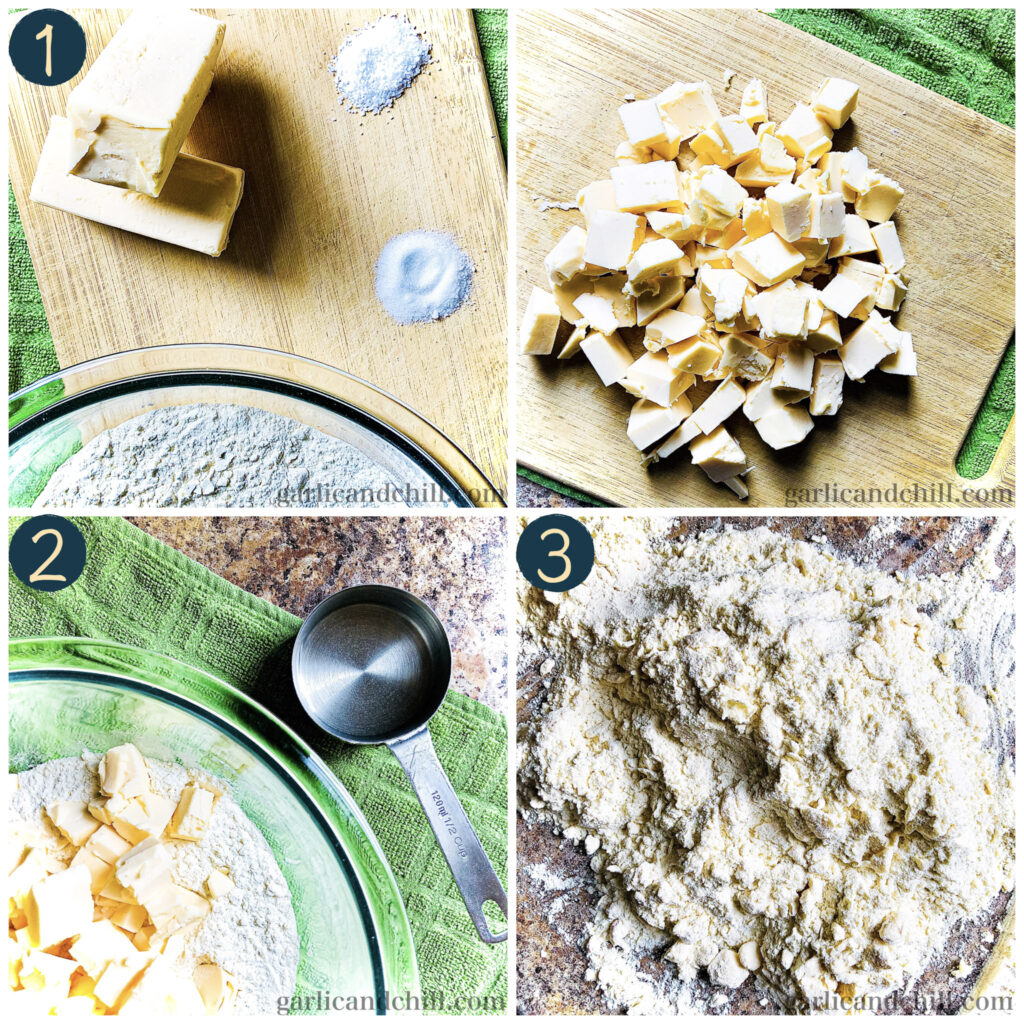
Whisk flour, salt, and sugar together. Toss frozen butter into the flour mix for a sec to coat, and turn out onto the counter.
With the base of your palm, push the lumps of solid butter into the flour in long lengths along the counter, pushing away from you.
Stop as soon as all the butter lumps are smooshed out flat, but do not knead it!
This distributes the fat in long, flat sheets throughout the dough, creating more flakiness throughout the crust. (Any further handling has to be gentle from now on so as not to cause further gluten formation; we don’t want a denser, less flakey crust. Be lazy, no stress, don’t think about it.)
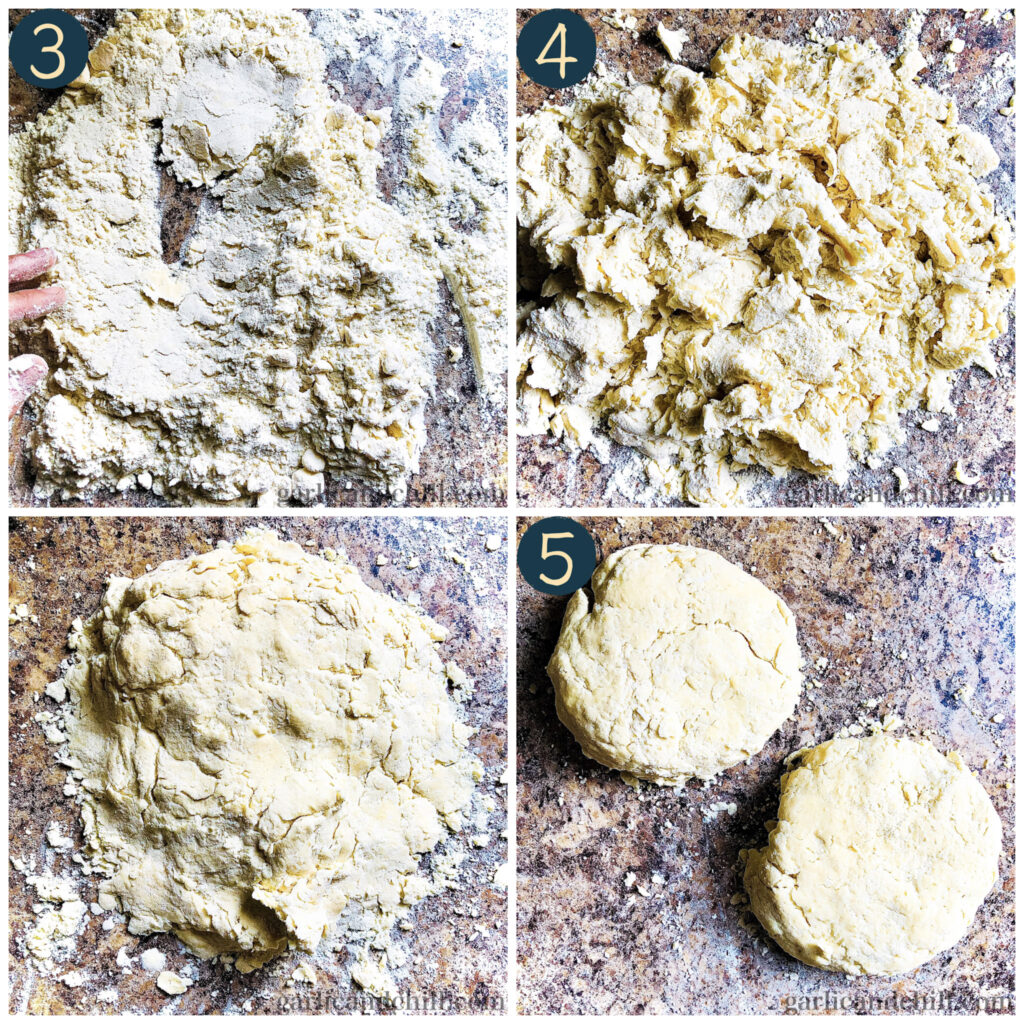
Put the mix into a bowl, add the water, and stir with two fingers. You want to combine the shaggy dough, pressing and shaping firmly into a ball. Cut in half, and shape each half into flat disks about the size of your hand outstretched.
At this point, you can wrap the dough disks in plastic wrap and store them:
In the freezer for long-term storage for up to 6 months, defrosting in the fridge overnight before use.
In the fridge, if making a pie within a couple of days.
Dust the counter surface with flour. Take one dough disk, and lay it on the counter, dusting flour over the top of the disk. Roll the dough upward from you using a rolling pin, starting from the equator center, then down from the equator center. Rotate the disk 60 degrees and repeat until it’s about ¼ inch thick.
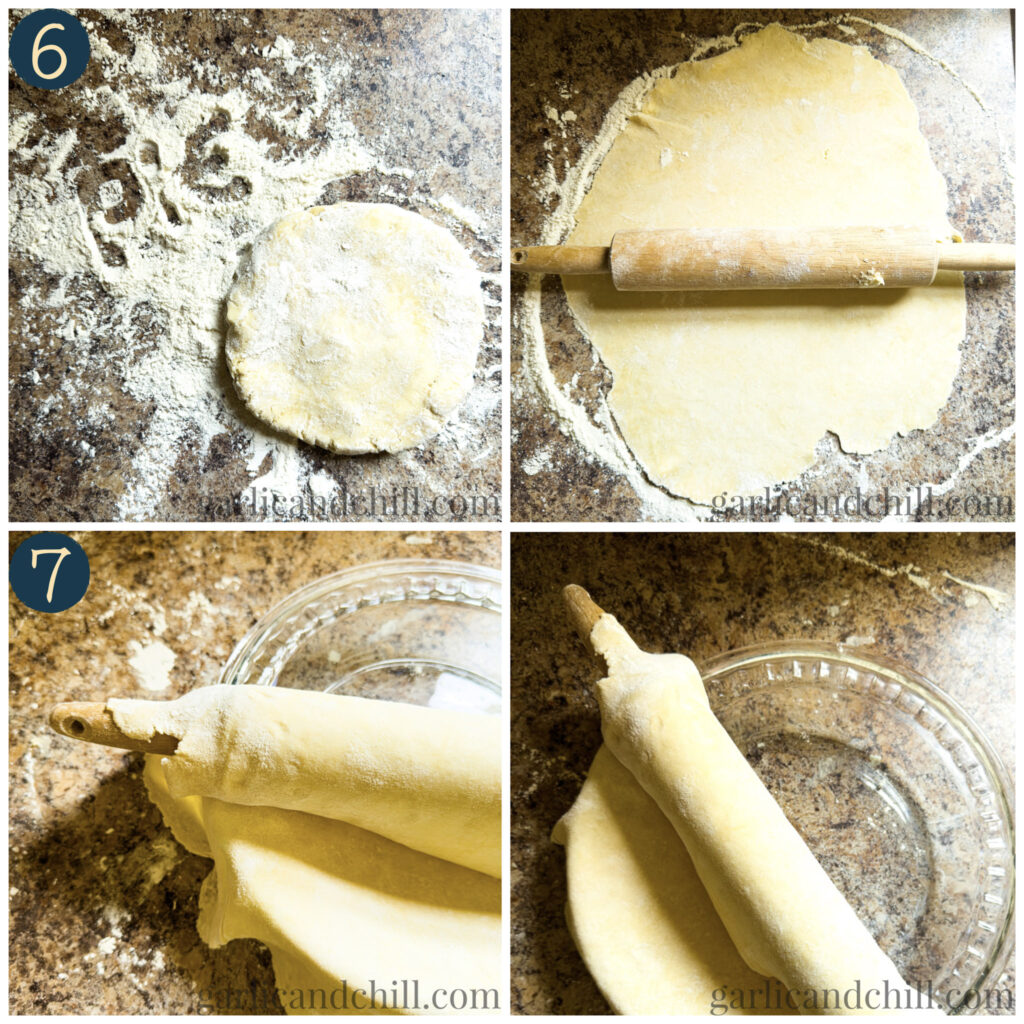
Dust with flour again, and gently roll the dough, from the counter, up onto the rolling pin, rolling down towards yourself until the dough is fully rolled onto the rolling pin.
Place the pin on the far end of the pan you plan to bake in, and gently roll it away from you to place.
(You can also use this same method to transfer a top crust.)
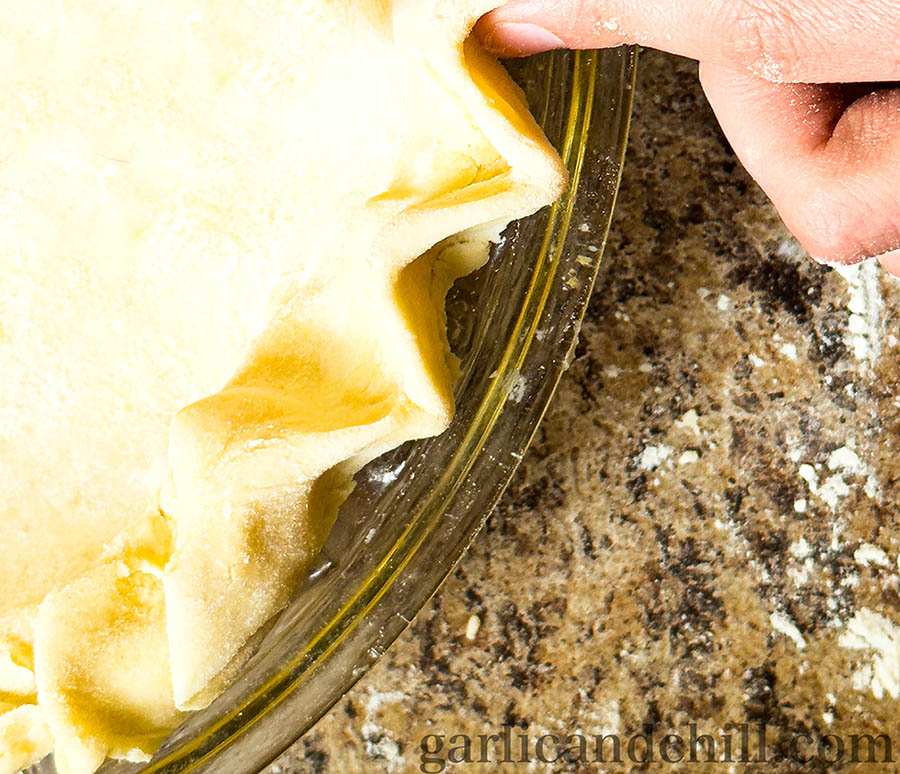
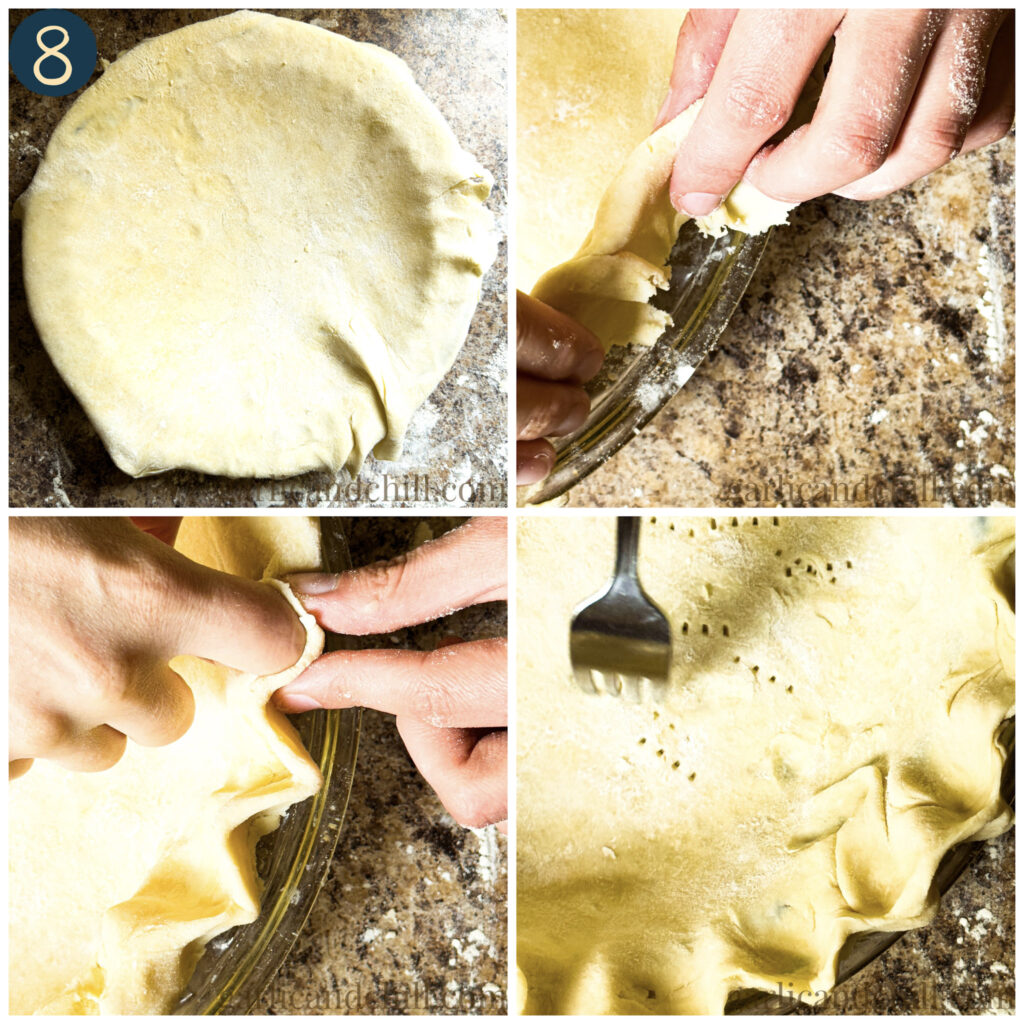
Carefully nudge the dough sheet to fit the pan’s sides and size. If there’s any breakage, use bits of dough to patch. If it looks rough, don’t worry, it’s ‘rustic.’ If any dough hangs over the pan’s edges, tuck it underneath itself to build the crust’s edge. From there, use your fingers to finish shaping the edge around.
Dock the bottom of the crust with a fork, allowing steam to escape in the oven as it cooks later on.
Use both pie doughs to make a covered pie, or save one dough for a future pie project.
Store extra in the freezer wrapped in plastic wrap until ready to use.

At the start of the recipe, change the sugar to 1/4 cup, and add 2-TBLS Cornmeal/Polenta and 1/8 tsp Baking Powder! As shown above, this will make the two dough discs for two separate galettes.
Ingredients
Directions
Cube butter into medium-size cubes and freeze solid.
Whisk flour, salt, and sugar together. Toss frozen butter into the flour mix for a sec to coat, and turn out onto the counter.
With the base of your palm, push the lumps of solid butter into the flour in long lengths along the counter, pushing away from you.
Stop as soon as all the butter lumps are smooshed out flat, but do not knead it!
This distributes the fat in long, flat sheets throughout the dough, creating more flakiness throughout the crust. (Any further handling has to be gentle from now on so as not to cause further gluten formation; we don’t want a denser, less flakey crust. Be lazy, no stress, don’t think about it.)
Put the mix into a bowl, add the water, and stir with two fingers. You want to combine the shaggy dough, pressing and shaping firmly into a ball. Cut in half, and shape each half into flat disks about the size of your hand outstretched.
At this point, you can wrap the dough disks in plastic wrap and store them:
In the freezer for long-term storage for up to 6 months, defrosting in the fridge overnight before use.
In the fridge, if making a pie within a couple of days.
Dust the counter surface with flour. Take one dough disk, and lay it on the counter, dusting flour over the top of the disk. Roll the dough upward from you using a rolling pin, starting from the equator center, then down from the equator center. Rotate the disk 60 degrees and repeat until it’s about ¼ inch thick.
Dust with flour again, and gently roll the dough, from the counter, up onto the rolling pin, rolling down towards yourself until the dough is fully rolled onto the rolling pin.
Place the pin on the far end of the pan you plan to bake in, and gently roll it away from you to place.
(You can also use this same method to transfer a top crust.)
Carefully nudge the dough sheet to fit the pan’s sides and size. If there’s any breakage, use bits of dough to patch. If it looks rough, don’t worry, it’s ‘rustic.’ If any dough hangs over the pan’s edges, tuck it underneath itself to build the crust’s edge. From there, use your fingers to finish shaping the edge around.
Dock the bottom of the crust with a fork, allowing steam to escape in the oven as it cooks later on.
Use both pie doughs to make a covered pie, or save one dough for a future pie project.
Store extra in the freezer wrapped in plastic wrap until ready to use.
At the start of the recipe, change the sugar to 1/4 cup, and add 2-TBLS Cornmeal/Polenta and 1/8 tsp Baking Powder! As shown above, this will make the two dough discs for two separate galettes.